Most term plans are written in the first week and quietly abandoned by the fourth. Not because teachers are disorganised, but because the plan was a list of content, and a term is a fixed amount of time. Add a sports day, a public holiday and one topic that needs an extra lesson, and the plan and the calendar no longer agree.
This guide shows how to plan a term around the time you really have: count the lessons, place the assessments first, give each unit its weeks, protect a buffer, and keep the plan honest as the term goes. The free Term Planner builds the whole plan as an Excel workbook, with every date worked out for you.
Key takeaways
- Plan in lessons, not weeks: weeks × lessons per week, minus breaks, exam weeks and days off.
- Place the assessments first, then work backwards to decide what has to be taught before each one.
- Leave a buffer of roughly one lesson in ten unplanned. You will need it.
- Plan each lesson as a one-line focus; write full lesson plans a week or two ahead, not a term ahead.
- Mark lessons as taught, moved or cancelled as you go, so the plan shows where you really are.
Step 1: count the lessons you actually have
Start with arithmetic, not content. Take a ten-week term with three lessons a week for one class:
| Item | Lessons |
|---|---|
| 10 weeks × 3 lessons | 30 |
| Less a one-week mid-term break | −3 |
| Less a public holiday on a lesson day | −1 |
| Lessons you can plan | 26 |
| Of which in an exam or revision week | 3 |
That is already four fewer lessons than "ten weeks of three" suggests, before you account for trips, assemblies, fire drills and the lesson that turns into a conversation about something that happened at lunch. Knowing the real number early is the single most useful thing a term plan does.
Step 2: place the assessments first
Decide what students must be able to do by the end of the term and how you will check it: a unit test, a piece of written work, a presentation. Put those on the calendar first, with their real dates. Then work backwards: everything a student needs for the unit test has to be taught, practised and revised before that week.
This is sometimes called backward design, and it has a practical benefit beyond good teaching: it shows you immediately if a unit is being squeezed. If the persuasive writing assessment is in week 5 and the teaching for it needs five weeks, there is no room for anything else before it.
Step 3: give every unit its weeks
Now lay the term out week by week. A term overview needs only a few columns:
- Week and its dates, so nobody has to count on their fingers.
- Type: teaching, exams or break.
- Unit or topic for the week.
- Learning objectives, one or two per week.
- Assessment, if there is one that week.
- Key dates and notes: the holiday, the deadline, the trip.
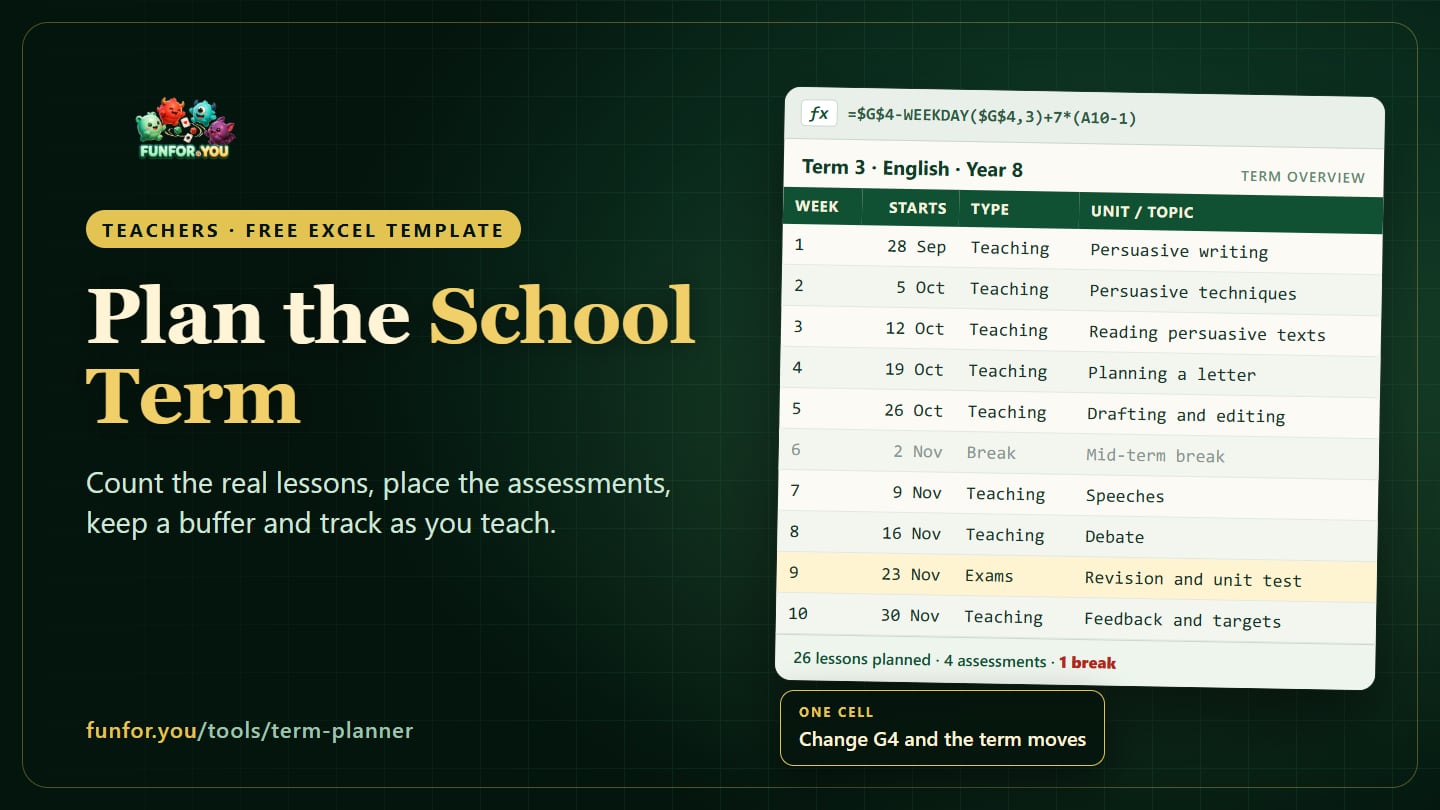
A sample overview for an English class might run: weeks 1–2 purpose, audience and persuasive techniques; week 3 reading persuasive texts, with a reading quiz; weeks 4–5 planning, drafting and editing a persuasive letter, handed in at the end of week 5; week 6 mid-term break; weeks 7–8 speeches and a class debate; week 9 revision and the unit test; week 10 feedback and targets.
Notice what the example does: every assessment sits at the end of the teaching it checks, the break is on the plan, and the final week is for acting on feedback rather than new content.
Step 4: protect a buffer
Plans fail because they are planned to the last lesson. Something always takes longer, and a plan with no slack forces a choice between rushing the next topic and dropping one. Leave roughly one lesson in ten unplanned: in a 26-lesson term, two or three lessons marked "catch-up" or left blank. If you do not need them, they become extension or revision lessons, and nobody minds.
Step 5: plan lessons at the right level of detail
A term plan is not twenty-six full lesson plans. Written in week 0, they would be out of date by week 3. For each lesson, write a one-line focus: "Rhetorical questions", "Comparing two adverts", "Peer feedback on drafts". Write the detailed plans a week or two ahead, when you know how the previous lessons actually went.
Step 6: track the term as it happens
The plan is most useful in week 6, not week 0. After each lesson, give it a status:
- Taught: done as planned.
- Moved: it happened, but later or in a different form.
- No lesson: lost to a holiday, an event or an exam.
Two numbers then tell you where you are: lessons taught against lessons planned, and how many buffer lessons are left. If week 5 finds you three lessons behind with one buffer lesson left, you know now, not in week 9, that a topic needs trimming.
Common term-planning mistakes
- Copying last year's plan without last year's calendar. Holidays move, and so do exam weeks.
- Forgetting the days you lose. Sports days, training days and trips all cost lessons.
- Planning content, not lessons. "Unit 3: Marketing" is a topic; "six lessons" is a plan.
- Assessing in the same week as the last lesson on the topic, with no time to practise or revise.
- Never recording what moved, so next year's plan repeats this year's squeeze.
Build it in the free Term Planner
The Term Planner does the counting and the dates for you:
- Enter the subject, class and term, the first day of term, the number of weeks and the days you teach this class, Monday to Saturday.
- Mark each week as Teaching, Exams or Break, and give it a topic, objectives, an assessment and notes.
- Open a week to write the focus of each lesson. Lesson dates are worked out from the timetable.
- Add the days off. A lesson that falls on one becomes "No lesson" automatically.
- Download the Excel workbook.
The workbook has two sheets. Term overview lists every week with its dates, type, topic, objectives, assessment and notes, plus live counts: weeks, teaching weeks, lessons planned, lessons taught, progress and assessments. Lessons has a dated row for every lesson, whose topic follows the overview, with columns for the focus, activities, resources and homework, and a status drop-down: Planned, Taught, Moved or No lesson. Breaks, exam weeks and cancelled lessons are shaded, and both sheets print on landscape pages with the headings repeated.
Every date in the workbook comes from one cell, the first day of term. Change it and the whole term moves, which makes next year's plan a two-minute job (check the days off, which are fixed dates). The file opens in Excel, Google Sheets, Numbers and LibreOffice. Nothing is uploaded; free downloads carry a small "Made via FUNFOR.YOU" line.
For the assessments themselves, the Test Paper Maker builds printable tests with an answer key; our guide to writing multiple-choice questions helps you make them count.
Frequently asked questions
How many weeks is a school term?
It depends on the country and the school. Many school systems use terms of roughly ten to fourteen weeks, often with a short break in the middle. Use your school's calendar for the dates, and count the weeks you actually teach.
What is the difference between a term plan and a scheme of work?
A scheme of work describes what a unit teaches and how, usually without dates. A term plan puts units, lessons and assessments on the real calendar. Most teachers need both: the scheme says what, the term plan says when.
Can I use the planner in Google Sheets?
Yes. Upload the downloaded .xlsx file to Google Drive and open it with Google Sheets. The dates, counts, drop-downs and shading all carry over.
What if I fall behind?
Use the buffer first. If that is gone, decide what to trim rather than rushing everything: combine two lessons, move a topic to homework, or shorten a practice activity. Record what moved so next year's plan allows for it.
Should every lesson have objectives?
Each week should have one or two clear objectives on the plan. Individual lesson objectives belong in the lesson plan you write closer to the time.